Introducing Podium Panoramas              日本語

Podium equirectangular render

Add 360° interactively to your renders with Podium's newest feature.

  What are SU Podium Panoramas?

The SU Podium Panorama feature will create a 360° X 180°, panoramic sphere (sometimes referred to as Panorama VR) of a rendered equirectangular image. This enables you and your clients to view the final panorama VR in a virtual 360 spherical environment on any device. The Panorama VR can be viewed in any browser that supports WebGL such as Internet Explorer, Safari, Chrome and Firefox, iOS and Android devices, and even using Google Cardboard. You can also save the Panorama to your local drive and view without using the Internet or upload to Cadalog's free Panoramic Server and share your URL with clients. You can also host the panorama files on your own web site.

 See examples of panoramas in the Podium Panorama Gallery

Click the image to view an example Podium panorama.

  How do I create a Panorama?

Watch: We've created a Pano introduction video that goes through the entire process from start to finish. Watch the video here, or scroll down to read the pano documentation:

Pano rendering introduction

Watch the embedded video above, or click here to open in a new window

There are three broad steps required to create the virtual panorama experience.

  1. Render an equirectangular image: The first step is to render a flat projection of a sphere, called an equirectangular image (See the image at the top of this page, for an example). You need SU Podium V2.5 or V2.6 to do this.

    There are several best practices to use when creating a high resolution equirectangular image. These steps are outlined in the following section of this guide, but the process is very easy and fun and you may enjoy experimenting with how to get the most impressive results.

  2. Convert the image in PIE or in the Panorama Server to a spherical panorama: Use PIE or alternatively the Panorama Server (www.panopdm.com) to automatically convert your equirectangular image into a 360° X 180° spherical panorama. PIE gives you free access to Cadalog's Panorama server called www.panopdm.com which you can automatically upload and convert the equirectangular image to a 360° X 180° spherical panorama. The panorama server automatically converts the images to a spherical panorama and creates a URL. The URL can be sent to your clients who can use any device (Windows, Mac, iOS, Android) to view the 360° X 180° experience of your design.

    Once the image is converted you can rotate and tilt the camera in any direction, creating a virtual, 360° spherical experience. The final Panorama is viewed in any HTML5 browser such as Internet Explorer, Safari, Chrome or Firefox and on an iOS or Android device. The Panoram can also be viewed on VR devices such as Google Cardboard.

  Render an equirectangular image using Version 2.5 or V2.6

Panorama options

The first step in creating the Panorama VR is to render an equirectangular image using SU Podium V2.5 or V2.6. This process is almost identical to rendering any SketchUp scene except you will use the Panorama mode for image size. The equirectangular image you want to render is a flat projection of a sphere.

To render a scene as an equirectangular panorama, simply chose "Panorama" from the options window.

This equirectangular image will then need to be "mapped" to a 3D sphere in an HTML file using Podium Image Editor's Panorama feature or the www.panopdm.com server.. This is an automatic, one-step process with no messy stitching involved. The conversion process is extremely simple.

The below image is an example of the rendered equirectangular image. Straight out of Podium, it is flat.

When this equirectangular image is converted to a 3D sphere in PIE or in the Panopdm.com server, you and your clients can open the generated .htm file and examine your rendering in a 360° panoramic virtual sphere. You can also use Google Cardboard to obtain a VR experience.

  Back to top

 Image Settings

1. Image resolution and aspect ratio:

When you select Panorama in Options, the aspect ratio of Width to Height is automatically converted to a 2:1 ratio. You can change the Width pixel resolution but the Height will always be 50% of the width. This is because for panorama spheres the field of view is 360° X 180°. Any different aspect ratio will result in distorted final panoramic sphere.

As you experiment with how the final panorama should look, you will recognize that the higher the pixel resolution, the higher the quality of the final panorama VR. But keep in mind that the higher the resolution, the longer the render will take. And also, the higher the resolution, the larger the final panorama VR files, which is an important consideration when sending panorama files to clients.

2. Recommended Presets

For highest quality results the interior_high or exterior_high or the new bright 2.0_high are recommended although it's not required. Any preset will work. However, there are two things to keep in mind.

  1. The equirectangular image can take four to six times longer to render than the standard perspective still image. That is because the view being rendered is 360° X 180° and Podium takes into account everything in front and behind the camera.
  2. The _high presets can take 3 to 4 times longer than the _default presets . You may want to experiment with much lower resolutions and presets just so you can render faster to experiment with the results. You might reserve the higher quality presets for your final equirectangular image.

3. Image Format - JPG or PNG

The best image format to save your equirectangular image is .png or .jpg. PNG will have a higher quality but we result in a larger file. At this point, .hdr because Podium Image Editor does read .hdr to the Panorama server can not convert an .hdr image to a spherical panorama.

4. Where is the equirectangular image saved?

The equirectangular image or the flat projection of a sphere, is saved in the same location as your rendered image is saved.

By default, SU Podium will save the final rendered image to the same folder as where the SketchUp model is saved. However you can select Custom to save to a folder of your choice. After selecting custom, click on the Browse button to choose the folder on your computer you would like to save the final rendered images to.

If you are having problems saving the rendered image to a custom folder, please read this FAQ item.

Important note: If you Generate a Panorama to be saved on your local folder, this is same folder that the spherical Panorama .htm file will get saved. These two files must remain in the same folder if you plan to display the Panorama from your computer or if you plan to create your own web pages. If you choose to use the Panorama server, you do NOT need to be concerned about where the htm file is saved.

  Back to top

  Tips for Rendering Good Panoramas Camera placement and tilt

Finding the best way to create the final Panorama VR may simply come from experimenting. However, here are two important tips that you may find very useful - A. Placing the camera in the center of your scene and B. Reset Tilt.

  1. 1. Placing your camera in the SketchUp scene:

    Before rendering the scene, consider where the SketchUp camera should be placed. Because the final Panorama VR is a virtual sphere, you want the SketchUp camera to be somewhere near the center of your scene. This is particularly true with interior scenes. This will make sense after you create a few 360° spherical panoramas.

    It is difficult to visualize the position of your camera without viewing from inside a sphere. But take a minute to find a center position for the camera so your view will not be obstructs by walls or other objects as you rotate the camera in a Panorama sphere.

  2. 2. Reset Camera Tilt to Zero

    The camera tilt angle is the vertical up and down angle of the SketchUp camera. Because the Panorama VR simulates a spherical environment, it is best to set the SketchUp camera tilt angle to zero before rendering to minimize distortion. Zero tilt angle is a position where the SketchUp camera is pointed horizontally and parallel to the ground plane. If you have not used Advanced Camera Tools, you may not know how to control the camera tilt in SketchUp. There are three ways you can reset the SketchUp camera tilt angle to zero.

    1. Reset tilt: This is a utility program we have created that will reset the camera tilt to zero. When you invoke Reset Tilt, your camera tilt angle will be reset to zero. You will notice the change. Reset Tilt is located in the SU Podium Tools pull down menu. This is the best option for resetting tilt.
      Reset camera / tilt
    2. Two point perspective: SketchUp's two-point perspective will change the camera tilt angle to zero. One problem with this option is there is a two point perspective bug with SU Podium in that you can not go from one two point perspective scene to another without first going out of two point perspective.
    3. Advanced camera tools: If you create a camera using SketchUp's Advance Camera Tools (ACT), the tilt angle of the custom camera will be displayed. You can change the tilt angle to zero using the ACT features. Please read about ACT in the SketchUp help pages.

  Back to top

Create your spherical Panorama VR with the Panorama server

Now that the rendered equirectangular image is complete, the image needs to be converted to a 360 X 180 spherical panorama. The easiest method to do this, is to use the www.panopdm.com free, panorama server.

You can access the www.panopdm.com, Panorama server directly from the Podium Image Editor.

You can also load the equirectangular image directly to the Panorama server menu in the SU Podium pull down menu. You can also access www.panopdm.com from any browser.

Furthermore, you can create your spherical Panorama locally on to your hard drive using Podium Image Editor. This comes in handy if you want to embed your panoramas in your own website.

1. Launch PIE from the Edit button in Podium Render Manager

Podium Image Editor

You can launch PIE from the Podium Render Manager or OOPR after you have rendered the equirectangular image. Highlight the rendered image name from OOPR and click on Edit.

You can also launch PIE from the SU Podium Tools menu. This is an independent way of starting up PIE. Once PIE is opened, use the Open file menu to load up the equirectangular image that you want to convert into a Panorama VR.

2. Adjust filters if necessary

Podium Image Editor or PIE is a "built-in" image edit tool like a simple Photoshop. Just as with any rendered image, you can apply any of the filters to the equirectangular image, before creating the Panorama HTML file. Read about all the PIE features here.

If you do apply any of the filters such as light levels,make sure you click apply and save the image. Until you save, PIE adjustments are stored in system memory—if you do not save before you create the Panorama HTML file, your changes will not be reflected in the panorama.

3. Upload the equirectangular image and let the Panorama server do the rest - the easiest option

Once you are ready to create the Panorama, go to PIE's file menu and select Panorama or click on the Panorama icon from PIE's tool bar.

The easiest way to create a spherical panorama and share with your clients is to use the Upload to web server button.

This action will bring up the Upload Panorama dialog box. If you already have a free account on www.panopdm.com, login and upload the image.

If you do not have an account please skip down to this section to find out how to create a free account on www.panopdm.com.

Once you gain access to the Panorama server, your image will be loaded automatically and a spherical panorama will be created. A unique URL will also be created, which you can send to your clients, so that they can open the panorama using an Browser or any device such as an iOS or Android device.

  Back to top

 Sharing a Panorama using the Panorama server

One of the main purposes in creating Panoramas of your photo-realistic renderings is to give your colleagues or your clients a better understanding of your design. Therefore delivering the Panorama to other people will be very important. The free Panorama server from Cadalog, Inc. (www.panopdm.com) is the easiest and best method of creating spherical panoramas and delivering to your clients.

The Panorama that is generated by panopdm.com can be viewed on practically any device, computer or mobile. The Panorama support the iPhone's gyroscope feature as well and supports Google Cardboard making a dynamic VR experience.

Upload directly to the Panorama Server from PIE or from any web page- Starting Podium Image Editor includes an option to upload a panoramic render directly to the Podium panorama server (described above). This allows you to generate a unique URL for your spherical panorama automatically without leaving Podium. You will also have direct access to the Panopdm.com panorama server from SU Podium pull down menu.

  1. Go to www.panopdm.com and register (it's free!!). Create a user name and password.

  2. Then Login with your new user name and password
  3. Create a new category.

  4. Start uploading Podium created equirectangular images.

  5. Once your equirectangular image is uploaded, click on View Panorama. This will generate a spherical panorama. The URL created can then be copied and sent to your client by email.
  6. Examine how to send your spherical panorama URL and view in Google Cardboard or other VR devices.
  7. Read about how to upload share your panorama thru Facebook.
  8. Check out our Panorama video tutorials.

  Panorama tours:

You can now link several panoramas together to create Panorama "Tours" via embedded hotspots on the Pano server. This feature lets you showcase an entire multi-room project, and link between interior/exterior imagery from a single Panorama URL. Please read more about Panorama tours here.


  Alternatives to the Panorama server

The above information is all you need to create your equirectangular image, spherical Panorama VR and how to share the Panorama with clients. However, you may have many reasons for wanting to use alternatives to the Panorama server from Cadalog, Inc. This is discussed in this section.

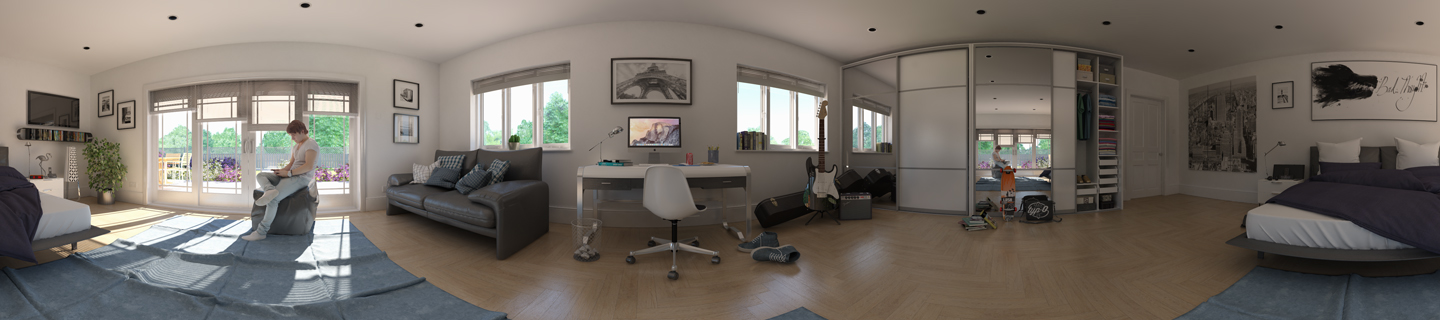
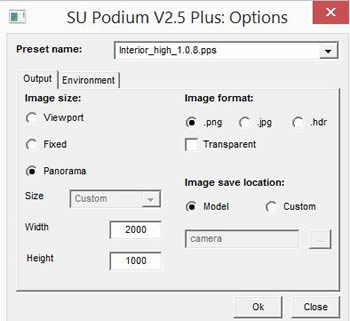
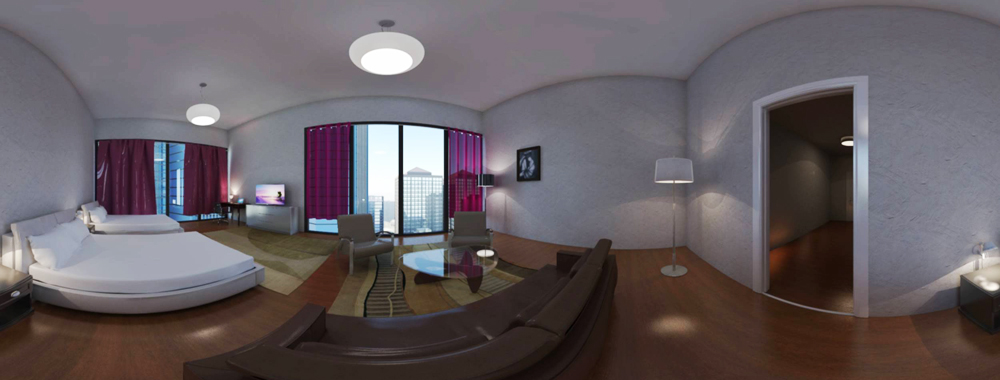
SU Podium has the ability to create a photo-realistic equirectangular image which is a flat projection of a sphere. You can convert these images to spherical Panorama's using the Panorama server (www.panopdm.com) thru Podium Image Editor or directly from the SU Podium pull down menu.

But there are alternatives to the Panorama server.

  1. For example, you may want to create the panorama on your local drive so you can create your own web pages with the Panoramas or send clients your .htm and .jpg files by email.
  2. Or you may want to upload your photo-realistic equirectangular image using other services such as Sphercast.org.

1. Create the Panorama VR HTML on your local drive

Panorama PIE link

There will be times that you will want to create the spherical panorama on your local computer. For example, you may have your own web site that you want to display the Panorama's on. In this case, you will need the panorama .htm file and the original equirectangular image file.

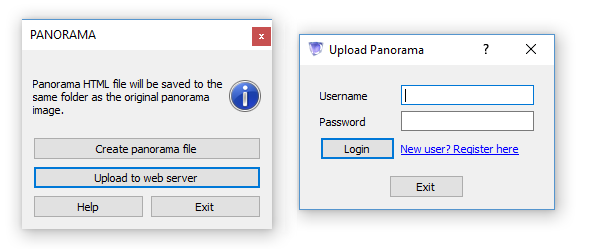
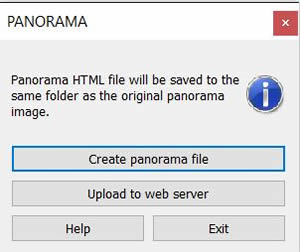
From inside Podium Image Editor, if you use Create panorama file instead of Upload to web server, this will create a Panorama .htm file and save it to the same folder that the equirectangular image file is. It may take a few seconds but the 360° sphere will display inside your default browser of your Windows or Mac computer. If you do not have a default browser, your operating system may prompt you to choose one.

Any browser that supports HTML 5, which most modern browsers do, will work. This means Internet Explorer, Safari, FireFox or Chrome will work. If you decide to create the panorama file and save it to your local drive, be aware of a few things listed below:

  1. Where the local Panorama files are saved - Same folder as your .jpg or .png file.

    When you use create panorama file, a .htm file is automatically saved to the exact same folder that the .jpg or .png equirectangular image is located. The .htm file will have a name such as BARCELONA2-SCENES-WITH-CLOUDS2_supodium-pano.htm. The .htm file uses the file name of the equirectangular image file and puts supodium-pano.htm suffix at the end of the file name.

    The image file and the .htm file must be in the same folder because both are needed to create the spherical Panorama. The Panorama program reads the equirectangular .jpg or .png file and maps this to a 360° virtual sphere and save this to an HTML (.htm) file. So both files must be in the same local folder. This fact will be important to know if you need to create your own web pages with your panoramas.

  2. Troubleshoot displaying the local Panorama with your local browser.

    1. The Panorama is possible because it uses WebGL, which uses the HTML5 canvas element. Almost all current browsers, support WebGL and HTML5 including Safari 6 and above, Internet Explorer 11, Chrome and FireFox. Even up to date Android and iOS devices with Chrome or Safari support WebGL.

      If you choose to create the Panorama .htm file on your local computer and are experiencing problems opening the Panorama .htm file, it may be due to having an older Browser. iOS device issues are discussed in the section about delivering the Panorama files.

    2. For Internet Explorer, you may see a message that says Internet Explorer restricts this web page from running scripts on Active X controls. Select Allow Blocked content.

  Back to top

2. Using email to send Panoramas to your clients

Note: Attaching the .htm and .jpg / .png file and sending by email is not the recommended method of sharing the Panorama with clients. The easiest way to share is to use the Panorama server discussed above. But there are times that you may need to send the Panorama files by email.

Attach a zip file with email

If your clients are using a Windows PC or a Mac, perhaps the simplest method is to email both the Panorama HTML file (a .htm file) and the equirectangular .jpg or .png image file. Both are needed by your client. Below is a suggested procedure.

  1. Use a zip program to zip up both image file and the .htm file.
  2. Then email this zip file to your client with the instructions to unzip the file so both the .htm and image file are extracted to the same folder.
  3. Once this is done, the client should open the .htm file to display the Panorama VR. The client might adjust the size of his/ her browser to get a better resolution.
  4. If your client is using Internet Explorer, you should notify him or her of the above described issue and to allow blocked content.

3. Uploading to your web site

Another way that you can share your Panorama VR with your clients is by hosting the Panorama to your web site.

There is more than one way to make a web page that contains your Panorama VR. Both the Panorama HTML (.htm file) and the equirectangular image file must be uploaded to the same folder on your web server. In the below two examples, we use a simple method and an iFrame method. Keep in mind, Safari on iOS has problems with iFrames.

A. Simple Method:

Simply upload the panorama file and image into a directory on your server and link to it as you would link anything else (i.e. from an image or text). For example, the following image links out to a panorama file:

Car showroom panorama

This just uses a standard anchor link. The code would look something like this:

<a target="blank" href="http://suplugins.com/pano/your-panorama-file.htm">
     <img src="http://suplugins.com/pano/pano-image-file.png" />
</a>

B. Using iFrame to embed the Panorama in a web page

We can use iFrames as well so that the Panorama is embedded in the web page and will display at the same size as the static image that is clicked on. However, iFrames will load the Panorama .htm file and the equirectangular image file. Therefore if your client's Internet connection is slow, the web page with embedded iFrames, may crash. Click on the image to go to the iFrame gallery page to see an embedded image example. The example, purposely uses a lower resolution JPEG image.

This method uses a still image with a JavaScript click event to activate the iFrame:

Embedded Podium panorama

<div onclick="panoImage=document.getElementById('panoEmbed');
panoImage.style.display='block'; this.style.display='none'"><img src="http://www.suplugins.com/pano/Bathroom800-400.png" width="800" height="400" style="cursor:pointer" />
</div>

<div id="panoEmbed" style="display:none">
<iframe src="http://www.suplugins.com/pano/Podium Bathroom -cadalog-2500_supodium-pano.htm" width="800" height="400" scrolling="auto" frameborder="0"></iframe>
</div>

Note: The .htm file is using an equirectangular image that is in the same Pano folder.

  Back to top

  Other Software and services

  1. Spherecast.org Upload.

    Spherecast.org is currently a free web service that will automatically turn your equirectangular image into a spherical panorama. It is very similar to the Panorama server - www.panopdm.com. All you need to do is upload the .jpg or .png image you created with SU Podium V2.5.x. Spherecast will do the rest and generate a unique URL. This URL can be shared with your clients.

    Here is an example of a Spherecast created Panorama from an SU Podium created equirectangular image. Spherecast is in beta currently. The only draw back is that horizontal edges appear slightly bent.

  2. TurnMePano for Android Devices.

    This is a free app for Android phones and tablets and works very well. Download it from Google Play. Email your client or yourself the equirectangular image from your computer. Open the email and save the image to your phone or tablet's gallery. Then open TurnMePano and select the equirectangular image. You will be pleasantly pleased with the high resolution of the spherical panorama. As you move your tablet or phone, the panorama will move.

  3. Easy Pano

    Easy Pano has commercially available software programs that will create a variety of Panorama VR from your SU Podium created equirectangular image. Panoweaver is a stand alone program that supports both Windows and the Mac. It will create Panorama HTML files as well as Quick Time and Flash Panorama's. It also has many more functions such as stitching photographs into Panoramic views.

    One thing Panoweaver has that Podium Image Editor does not is the ability to publish the flat spherical image (equirectangular) to Shockwave Flash. The .SWF file is supported by most modern browsers.

    Easy Pano also has an interesting program called Virtual Tour which similar to Pano Tour on Panopdm.com.

  4. Pano2VR

    This software program is similar to Easy Pano. It has various output options including HTML, Quick time and Flash. It is a bit more complicated than Panoweaver but has plenty of good documentation. It will convert your SU Podium created equirectangular image file to spherical panorama. Pano2VR claims to support iOS devices as well.

  5. What's New Sign up for SU Podium What's New here.

  Back to top