Render process and getting started
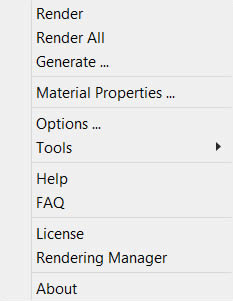
After installing SU Podium for SketchUp, you can access SU Podium from the SketchUp Plugins or Extensions pull down menu or from the SU Podium tool bar.

Before you render your first SketchUp model, get familiar with the Options dialog box and the various settings that are controlled there. We also recommend that you render a sample model from the SU Podium V2 models page as a way to test Podium.
To introduce yourself to SU Podium's rendering process, render a sample model from the sample models page. Follow this procedure:
- Before rendering, select the Options menu from the pull down or the tool bar.
- In the preset pull down list, pick Default.pps. This preset is not the best but is the easiest to start with.
- In the Output tab, under Dimensions, pick the default Viewport size for the rendered image size. Click the OK button.
- Select the image format.
- Then pick the Render menu from the pull-down or tool bar.
A series of processes will initialize after clicking on the Render icon or menu. If this is your first render, you will be prompted to Activate your license. Let's examine each part of the sequence.
- If you are using the 30 day free trial ignore the License Activation dialog box if you are not activating a full license immediately.
- Processing Scene - This first step is where SketchUp geometry and textures (materials) are exported to Podium's raytracing engine. If your SketchUp model is very big, this process can take several minutes or longer. The speed of processing scenes is determined primarily by the number of faces or polygons that the model has. Other determining factors are the number materials and point lights. For example, if you have several hundred thousand faces in your model, processing scene can take several minutes to complete. Processing scene's speed has changed drastically with the introduction of V2.6 and is up to ten times faster than V2/ V2 Plus. If you have not upgraded to V2.6, we strongly recommend that you do.
- Please read here if you find that Processing Scenes is taking a very long time.
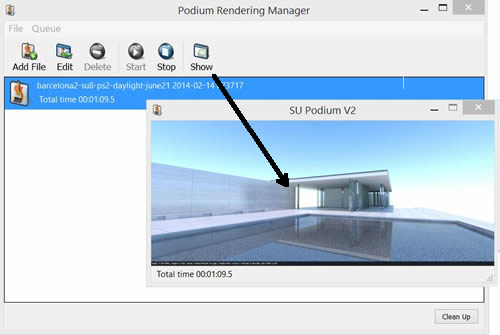
- The OOPR or Podium Render Manager will also be launched during Processing Scene. If you do not see see the Podium Render Manager dialog box, click on OOPR from the Task Bar in Windows or Dock in the Mac. You will see a message "receiving from network client" during Processing Scenes.
- If OOPR is not getting launched, please read here about possible problems.
- Computing Global PM is launched after processing scene and you will see this start in OOPR.
- Prerendering in progress - Next you will see an OOPR message telling you that Prerendering is in progress and indicating the percentage of completion. This is what is called final gathering in photon mapping and is where the irridience caching and indirect reflections are calculated. Sometimes Prerendering can be the longest process.
- Raytracing - Podium raytracing commences after Prerendering. From this point you can Preview your render.
- Resampling Edges - This is the final step and often takes longer than Raytracing. Most of resampling is the anti-aliasing process which smooths out the edges of your rendered image. The preset you choose from the Options menu controls the level of anti-aliasing.
Once Raytracing starts you can click on the Show button in the Podium Render Manager (OORP) to view the render progress dynamically. The preview image displayed by the Podium Render Manager will be smaller than the final rendered image. The final rendered image will be saved to the folder containing your SketchUp model unless you manually choose an alternate save location. Please read about this in the Options section.