Using the Podium Preset Editor
SketchUp 2022/2032 Mac users. The Preset Editor is not included in the V2.6.050 install.
About Podium Preset Editor - In V2.x it is now easy to modify presets or even create brand new ones using a new tool called the Podium Preset Editor, which allows full configuration of the Podium render engine's parameters.
It is still perfectly possible to edit the presets with a plain text editor. This is how they were created, and once you are familiar with the parameters, it's still the quickest way to edit them. If you open one of the presets with Notepad on Windows or Textedit on the Mac, you will see a series of individual lines and sections with related parameters.
Because it is for users with detailed knowledge of render engines, or Podium, we have not made the PPE's location immediately obvious.
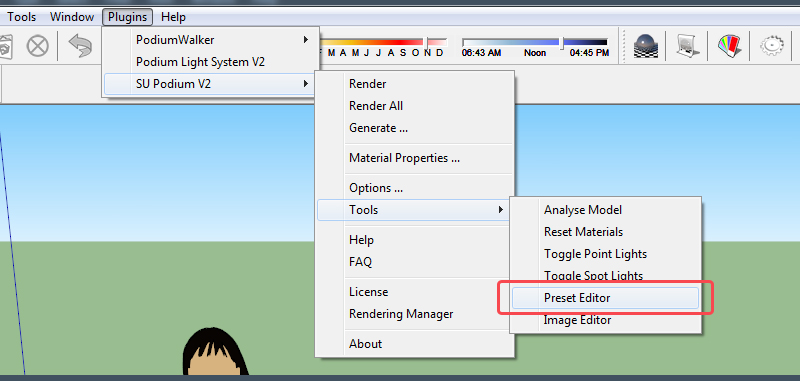
PPE can be launched from plugins folder, as seen in the lead image.
Follow the menu path Plugins ➔ SU Podium V2.x ➔ Tools ➔ Preset Editor to launch PPE.
The first time you open the editor, you will see that there are 4 parts to the interface:
- The main toolbar
- The basic preset parameters
- The detailed parameters grouped by type
- Guidance notes on usage and configuration of the selected parameter
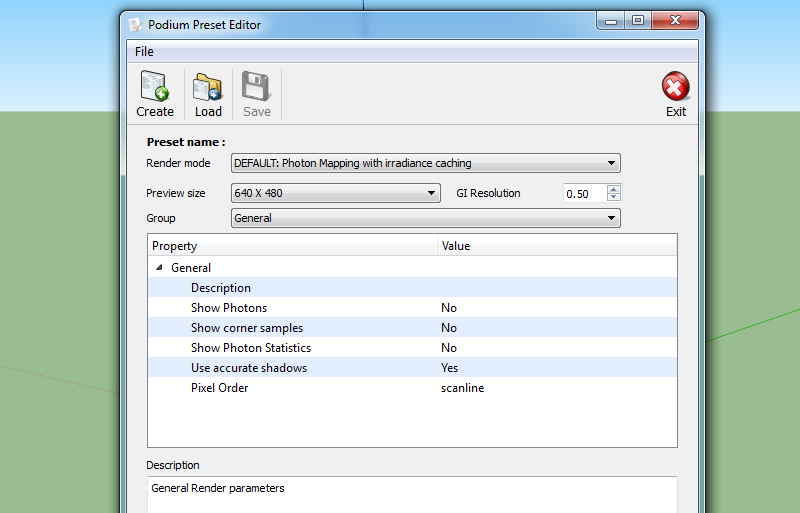
The Toolbar has the basic commands for creating, modifying and saving presets.
The Create Button allows you to create a new preset from scratch. Load allows you to use one of the existing presets as a template.
It is a bad idea to modify the standard presets. It is easy to change values and forget what you have done, and when you render, find that your preset doesn't produce a satisfactory result. It can be very difficult to manage and track changes, so revision control and naming of the various saved files is very important.
As a rule - ALWAYS create a duplicate with a new name and NEVER modify the original preset file. The editor prevents you from over-writing the standard presets. It is possible to bypass the protection, but we're not going to tell you how to do that in this tutorial! Note that if you create a new preset while SketchUp is running, Podium will not list the preset in the main dialog box until you restart SketchUp. You can modify existing presets while SketchUp is running without difficulty. You can freely edit your own presets.
When you load presets, the dialog box will not automatically find the preset folder. These are located here:
Windows
C:\Program Files\Google\Google SketchUp 8\Plugins\SU_Podium_V2\presets
C:\Program Files (x86)\SketchUp\SketchUp 2013\Plugins\SU_Podium_V2\presets
C:\Program Files (x86)\SketchUp\SketchUp 2014\Plugins\SU_Podium_V2\presets
Mac
\Library\Application Support\Google SketchUp 8\SketchUp\plugins\SU_Podium_V2\presets
\Library\Application Support\SketchUp 2013\SketchUp\plugins\SU_Podium_V2\presets\
\Library\Application Support\SketchUp 2014\SketchUp\plugins\SU_Podium_V2\presets
The 3 primary controls are the most basic things to configure. Render Mode determines the basic render algorithm that is used.
The only ones that are useful for final renders are the last 3 in the list. The last 2 are variants of the QMC algorithm. It's unlikely you will need to change the Render Mode.
Preview size sets the size of the render window you see in Podium Render Manager - OOPR. If you have a larger monitor, you can set this to a larger size. Because it doesn't affect the calculations, it shouldn't affect render time.
GI Resolution is an overall parameter controlling the render accuracy. It acts as a kind of 'global multiplier' for several other values and relates to the scale of the photon map. The base value is 1, which corresponds to 1m, but most parameters reduce this to 0.5, which improves the detail and accuracy of some of the other settings.
To avoid having a single long list of parameters in the dialog, we have grouped parameters which deal with related functions. Related sets of parameters are accessed from the Group pulldown menu:
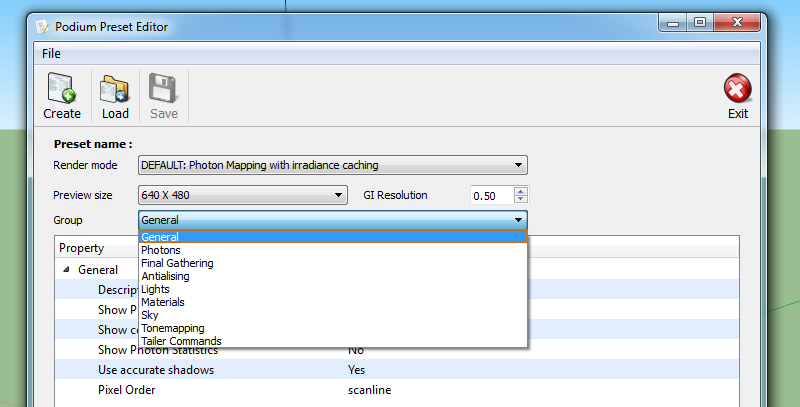
Note that there are descriptive notes for the sections themselves, as well as the parameters within them.
In each case, you need to select a particular parameter, read the guidance, and double-click on each value to edit it. From time to time we will vary or add more detail to the notes.
Configuring all the render parameters is too complex and detailed for this tutorial, but you can get more detail on configuring render parameters on the Kray website. The Learn section has lots of information on configuring parameters. Look out for e-news articles on configuring different aspects of presets.
Let's go through the major parameter groups and discuss how they contribute to the overall look of your final render:
Antialiasing: The Antialiasing section is notable in that there are two basic options. The first is Adaptive, which allows for individual antialiasing properties to be configured. Many of the presets use this. Fullscreen is fully automatic, and generally produces high quality results. Note that this can be overridden for individual materials, using the 'Edge Smoothing' control on the Materials dialog.
Lights: In the Lights section, note that there is an option to physically set the default size of omni lights. These are represented by geometry in SketchUp to set the insertion point, but are calculated as having a physical size which is determines light output. If you set this value too high, when omni lights are used inside light fittings, you may get light spilling out of the fitting and break the light distribution. Several of the parameters in this section set the defaults for each scene, and if you change them, the entire lighting balance of a scene will be different compared with other presets.
Overall brightness is set in the Sky and Tonemapping groups. The parameters affecting this are Sky Exposure, Sun Intensity and all the Tonemapping variables.
Tonemapping: The Tonemapping section is similar to adjusting brightness, contrast, saturation and gamma values in an image editor. Changing these values can subtly change the image balance. All presets use a balance between the Gamma and Exponential approaches. A higher gamma component gives a less contrasty and brighter, but less saturated image, a higher exponential component creates a more contrasty and richer image. Increasing the Exposure value increases scene brightness, but risks overexposure. The effects produced by altering these values are very subjective. There is lots of scope for experimentation with these, but it should be remembered that Sky Exposure and Sun Intensity also play their part in overall appearance.
Tailer commands: The tailer commands section allows you to configure several different types of image filters. You can adjust RGB balance, The Kray documentation has more information on these. This page lists the options. Note that most either do not apply to SketchUp or have been configured elsewhere already, but the 'needbuffers' and 'postprocess' lines are usable.
It's worth pointing out that configuring presets needs a systematic approach, or you will end up with folders full of presets and renders that look different, with no idea what you did to achieve each effect! You can learn a lot by comparing different presets and copying the values from one to another. Antialiasing and tonemapping are the two easiest sections to experiment with.
If you have any questions, please post them on the forums—happy tweaking!