Quick Start: Applying Materials
This quick start tutorial is an introduction to applying Podium materials to SketchUp faces and groups. This tutorial will also introduce you to EditInPlace, a utility for group and component editing. This tutorial can be used with the or can preceed the Quick Start Interior tutorial.
There is also a video tutorial that uses SU Podium V2.6 to explain how to use Podium materials. Please look at it here.
Let's start by opening the interior-quick-material-su8.skp file.
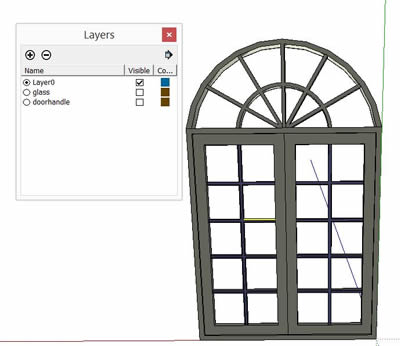
This model has two scenes. Scene 1 is for the interior and scene 2 is for the exterior. The model also has six layers.
From the scene 1, pick one of the arched French doors. The doors are instances of each other. Select a door. Right click for context menu.
There is also a video tutorial that uses SU Podium V2.6 to explain how to use Podium materials. Please look at it here.
Pick EditInPlace (on the Mac it would be EditInPlace:Open).
Windows:  Mac:
Mac: 
EditInPlace is similar to SketchUp’s Edit Components but it a few advantages. One is in that it creates a temporary session or instance of SketchUp with just the selected component. Also, only the layers and materials that are relevant to the component will be included in the new SketchUp instance.
Note: the name of the temporary instance is Group#x.skp
Let’s apply some materials to the door.
SketchUp’s Color_000 from the SketchUp color palette will be used on everything but the glass panes and door handles.
Turn off the Glass and Doorhandle layers from SketchUp Layer menu.
A quick way to apply Color_000 to the entire door is by turning the door temporarily into a group. Select everything, right click and create a group.
Paint the new door group with Color_000. (Apply the color to the group). After successfully applying the color to the group, explode the group. This action will apply the Color_000 to all the visible door faces.
Next let’s look at the glass pane and door handles.
We will use Glass_thin_02 from Podium Browser Material / Transparent category. The name of the thumbnail is Glass 02. This is a free material.
Open Podium Browser. Go to Materials/ Transparent category and download the Glass 02 material cube. As soon as it is downloaded, you can erase the cube. The glass_think_02 material will now be in the model and can be accessed from the SketchUp Material dialog box.
Make the current layer Glass and turn off Layer0 and Doorhandle.

Open SketchUp Material UI and click on InModel icon. There should be a glass_thin_02 material. Apply this material to all the glass panes of the door.
Take a minute to examine the properties of glass_thin_02.
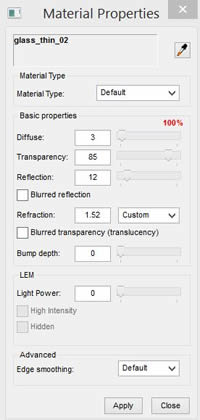
You should see glass_thin_02 name at the top in Podium Materials Properties UI.
Next lets apply a material to the four door handles.
Let’s use PDM Chrome from Podium Browser Material/ Metal category. PDM Chrome is a free material from Podium Browser.
Download PDM Chrome cube from Materials/ Metal.
After downloading, delete the cube.
Double click on one of the door handle component.
Now open SketchUp Materials InModel and paint chrome to all parts of the door handle.
Do this to the other door three handles.
Note: Door handles are comprised curved faces. A curved face is actually comprised of many planar faces, so if you pick the face with the chrome1 material, initially the Podium Materials Editor will not recognize the material. It will read 400 faces selected. In this case, use the Podium Materials Editor eye-dropper (for Mac users the SketchUp Paint eye dropper maybe easier) to select the chrome1 material that is applied to the curved door handle.
The chrome material is essentially a grey color with 75% reflection. You don’t need Podium Browser to create chrome or for that matter any material. It’s just a lot easier with Podium Browser.
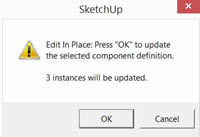
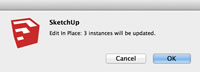
Save the door model or Group#5.skp and quit Sketchup (Mac users, simply close the current SketchUp session.)
This will bring us back to the original model with an EditInPlace message that asks if the 3 door instances should be updated. Click Yes.
Note Mac users: You will need to context click on the door component and then pick EditInPlace:Update.
Windows
Mac
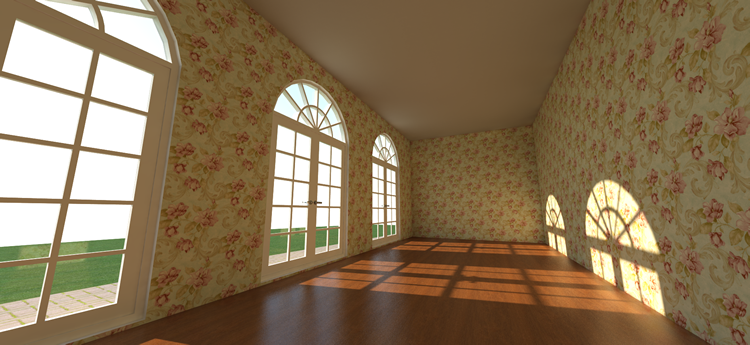
Your model should look like this now:

Now, let’s add materials to the rest of the model. First let’s download all the materials that we want from PB into the model. Here are the materials to download.
- The floor is wood acajou in the found in the Materials/ Wood category (not the wood floor category).
- For the ceiling material, I used PDM_canvas_01 also from Podium Browser. This material also has a Podium bump percent of 8%. This material found in the Materials/ Fabric category.
- For the walls, use any wall paper. But I used PDM_Wallquest_at40502. If you do not have a Paid content license, use one of the three free ones.
- For the outside patio, in the Material / Paving category I used Pdm_paving_018
- For the grass material, I used Material/ Ground, grass_01
Once these five cubes have been downloaded into the model, they can be deleted. If you go to the SketchUp Materials UI, and click on InModel, you will see that all five materials are now in the model.
Now, you are ready to apply each material to the appropriate floor, ceiling, wall faces. Click on Scene 2 to add the patio and grass material to the appropriate faces.
Click on scene 1.
Now you are ready to proceed to a test render.
Let’s create a test rendering with these SU Podium Options

- Preset name – Interior_default_1.0.5.pps
- Image Size – Viewport
- Image Format – png
- Image Save Location – your choice
- Background – Podium Physical Sky 2
- Options/ Env – turn all options off.
Your rendered image should look something like this:
Now you are ready to proceed to Quick Start Interior (Light) tutorial here.