- SUPlugins Home Page
- Help Video Tutorials
- V2 Plus: New, free
- Operating SU Podium V2
- 1. Install
- 2. Activate License
- 3. Render process and getting started
- 4. Download and samples to test
- 5. Where to get Support
- 6. What version do I have?
- 7. Check List to help Support.
- Options Menu
- Apply Material Properties
- Lights
- Render, OOPR, Preview
- Other items in the pull down menu
- Other Features
- 1. Podium Browser: Light Fixtures, Plants, etc.
- 2. Omni Grid V2
- 3. Podium::Render script
- 4. Podium Styles
- A summary of Tutorials
- FAQ and trouble shooting
- Migrating from Version 1.7.3
- SU Podium V2 Books
- Software End User License Agreement
Lights1. Sky Light, Sun Light - Natural LightsClick here to watch the natural light tutorial video Also read information and tutorials on:
SU Podium V2 has two types of natural lights. Sky and Sun. These are both "exterior" lights but can have great influence on interior renderings if your models have openings to the exterior such as windows and doors. Sky light is an ambient, exterior and uniform light source being emitted from the "sky". It is analogues to an overcast day where the sunlight is hidden. Sky light is always on. However, if you have interior designs with no openings to the exterior, sky light will be shut out. Sky light brightness is controlled by a variety of variables. One is the preset you choose from the Preset list in the Options menu. Another is whether you use SketchUp Sky or Podium's Physical Sky, also selected from the Options menu in the Environment section. If you have selected SketchUp Sky, SketchUp's background colors will control the sky light's brightness. If you have selected Podium's Sky or Physical Sky, SketchUp background colors will be ignored. Rather the time of day will be an important factor in sky light color and brightness. Also the Sun/ Sky Brightness sliders in the Options menu will have some influence. Sun light is another source of natural light. Sun light is only on when SketchUp Shadows are on. The sun's brightness and exposure are controlled by a number of variables:
But don't be intimidated by these variables. Take a look at the Options section below and try some settings. 2. Artificial Lights - LEM, Omni's and spot lights.Click here to watch the artificial light tutorial video. Click Here to watch the spot lights and SU Podium Light System video Interior Lighting Tutorials
a. LEM LightThe Light slider in the material properties menu will apply LEM (Light Emitting Material) to the specific texture you have selected. LEM lights are one type of artificial light source in SU Podium V2 and will create lights that emit light in one direction away from the face of the texture. LEM lights are easy to create and are quick to render. Light slider is the LEM light slider. Pick a texture and apply the light slider. This will turn that texture into a LEM Light. You can pick a value from 1 to 100. The values must be whole numbers.
High Intensity check box is applied to the LEM Light. When High Intensity is on, single digit power values should be used. Otherwise the LEM light will be extremely bright. In most cases, you will not need the High Intensity option. Note: Unlike Podium 1.X, V2 will apply Podium properties globally to textures. If you select a certain texture to have light, every surface in the entire model with that texture applied will emit light.
b. Hidden LEM optionWhen Hidden LEM option is checked on, the LEM light will be rendered but the SketchUp face and material that the LEM is applied to will not be rendered. This is a very useful feature if you want to hide the LEM light source and keep the light. Below is a simple example.
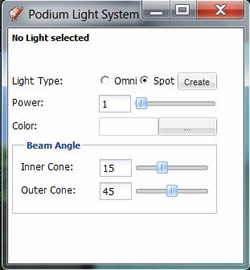
c. Omni Lights/ Point lightsClick here to watch the artificial light tutorial video. Omni light or Point light (name is used interchangeably in this document) is an artificial light source which emits light uniformly in all directions, similar to a light bulb. To insert an omni light or point light, click on the
There are some things to consider before creating an omni light. Power. The light power value for omni lights ranges from 1 to 100. Because light power is relative the the amount of ambient and natural light in the image and to the angle of your camera, you will need to experiment with power levels. Color. Color is self explanatory. Just as in the Light Properties menu, there is a color picker which allows you to apply various colors to the spot light. Default color is white. Placement. Once you have made Power and Color selection, click on Create. The omni lights have an intuitive inference method of placement based on a temporary XYZ axis with green, red and blue lines coming out from the center of the axis. Beam Angles. This option is reserved for Spot Lights only. Read more about the Podium Light System here.
d. Editing your omni lightIt's easy to adjust light power and color for omni/ point lights. Select the the light point component in SketchUp. You can do this by picking the component (very small) or finding it in SketchUp's outliner. The point light will have a name that starts as light-point. Once the light point component is selected, pick the light bulb icon from the SU Podium V2 tool bar or menu. Adjust the light power from this dialog box. You can use decimal values for omni/ point lights. To change color, pick the Browse button from this dialog box and then pick the color you want from the color user interface. For LEMs lights, select the material with the SketchUp texture i-dropper and adjust the slider in the Podium Material Properties dialog box. LEM lights only accept whole numbers. LEM light is a material property so different from a omni/ point light. e. Soft omni lights optionAs a default, omni lights/ point lights have "hard" shadows meaning the edge of the shadow cast by the omni light is hard. There is a soft shadow option that makes the omni lights look more natural. This option is accessed from the Options menu in the Environment tab. There is a significant render speed cost when using this option.
|


© 2026 Cadalog, Inc. All Rights Reserved.
