- SUPlugins Home Page
- Help Video Tutorial
- Forums
- FAQ and trouble shooting
- Operating SU Podium
- 1. Intro and Download
- 2. Install, Troubleshoot, Uninstall
- 3. Activate License
- 4. Render process and getting started
- 5. Download and samples to test
- 6. Where to get Support
- 7. What version do I have?
- 8. Check List to help Support.
- Options Menu
- Apply Material Properties
- Lights
- Render, OOPR, Preview
- Other items in the pull down menu
- Other Features and plugins
- 1. Podium Browser
- 2. Preset Editor
- 3. Omni Grid V2
- 4. Podium::Render script
- 5. RenderAll scenes
- 6. Podium Styles
- 7. Section_Tool
- 8. EditInPlace
- 9. PanoramaVR
- A summary of Tutorials
- SU Podium Books
- Software End User License Agreement
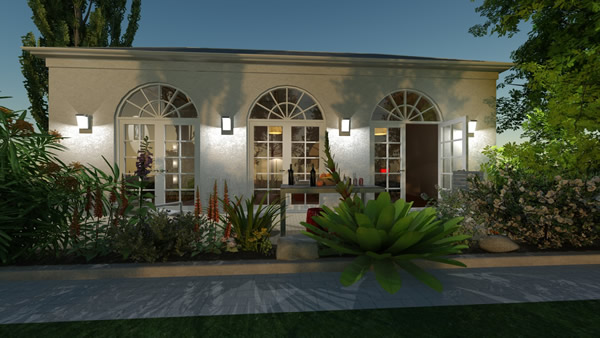
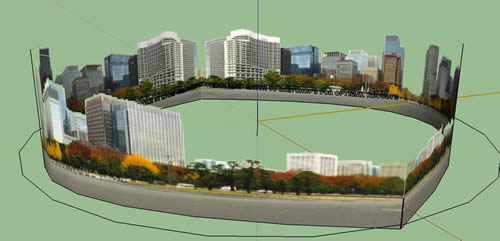
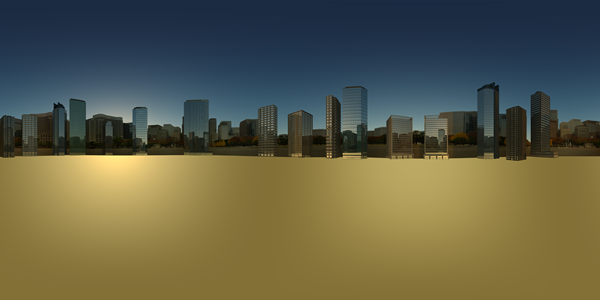
Exterior Panorama -tips and tricks, Part 1One advantage of SU Podium V2.5.1’s panorama rendering capabilities is that one can render the panorama with Transparent on and then in PIE use the background option and load another equirectangular as a background. This can be useful for exterior scene panoramas. Exteriors scenes are difficult to turn into 360 ° panorama’s because you need to fill all the space behind the camera with relevant content. It’s not as simple as picking a camera view and rendering. An obvious solution to the problem is to model with 360° in mind. But creating background environments that are 360 X 180 from scratch can be difficult and time consuming. Also, adding 3D backgrounds will make the model very large. An alternative method is to create two models, one for the main image and one model for the background image. Then render both these models as panorama equirectangular images. In this quick tips and tricks I will go over rendering two equirectangular images and then using one as a background to create the final spherical panorama. Below is the example will examine. Click the image to view the Panorama file. To do this, you need to render the foreground or main panorama with transparent on. Then load the main equirectangular image into PIE. Then load a different equirectangular image as a background, using the Load local option. The difficult part of this might be matching a background equirectangular image with the main foreground image. You can create your own 360 ° backgrounds by modeling it in SketchUp and then rendering the model as a panorama which will create an equirectangular image. Then use this background in PIE as the background for the main image. In this example, I created a cylindric 360°city skyline background in SketchUp. Let’s call this the city-skyline model and image. I used one of the city backgrounds from Podium Browser and best as I could scaled this into a 180° cylinder 2D background. Then I mirrored this and joined the two so the background is near (but not quite) 360 ° cylindric, 2D city skyline background. ( Cadalog will providing true 360° , cylinder backgrounds of various environments in Podium Browser soon.)
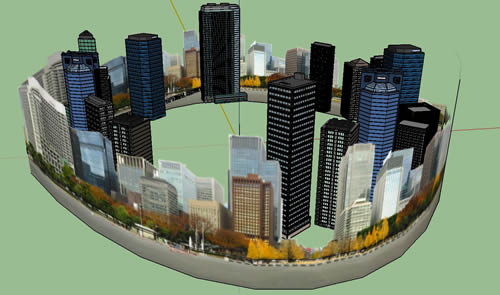
Then I placed several 3D building from Podium Browser background categories inside the "360" cylinder. I grouped the buildings together and made sure the two seams in cylinder backgrounds were hidden. I made sure the 2D background materials did not cast shadows by using the new cast shadow materials option in V2.5.1
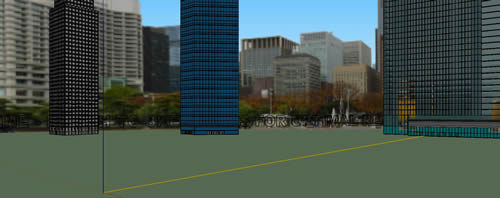
The below image is of where the camera should be placed which would be in the center position of the cylinder. Tilt angle is zero.
Then I rendered this as a .jpg, using Panorama option at 5000 X 2500, with exterior_high preset and physical sky 2 on. Transparent is off.
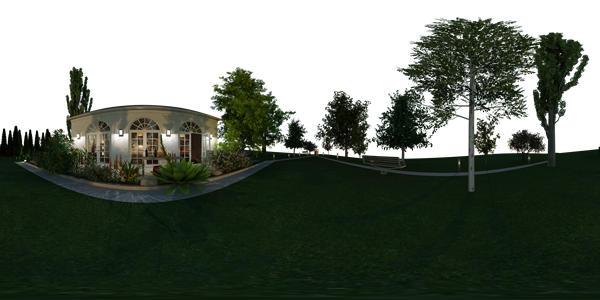
Next I loaded the main model which is called pano-park into SketchUp. This model already has terrain, trees and features a structure which is supposed to be house to host parties and gatherings. The camera is positioned so the entire house and patio is in view. I used Tilt Zero to make sure the camera was angled 90 degrees perpendicular from the ground. Below is a rectangular rendering of the model.
Before rendering this with panorama option, I checked the transparent box in Options. The file format must be PNG for transparent to work. I rendered at the exact same dimensions as the background which is 5000 X 2500. Preset used is the exterior_high preset to obtain the maximum quality. Once the render was complete, I used the Edit button in OOPR and opened the newly created equirectangular image in PIE. Here is what it should look like.
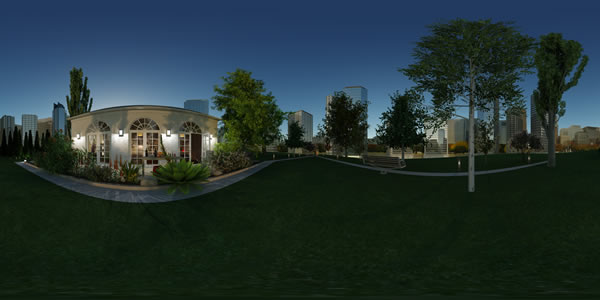
With this image loaded in PIE, I choose Load—Local from the Background option and loaded the previously created city skyline.jpg. When the background loaded, it should look like this in PIE.
Before converting this to a spherical Panorama.html file, you must remember to Apply the background and then save this new combined image. In this case I named the new image pano-park-final.jpg Once saved, you can select Create from the Panorama UI to create the 360 Panorama html file. The result is displayed at the top of the page as well in the link below. Here is a spherecast version of the final pano-park panorama
In the next Exterior Panorama Tips and Tricks Part 2, we will discuss how to use Google Camera and create equirectangular backgrounds of real locations as seen in the link below. Click on this link to get a sample image of the pan-park with an Google Camera created background. |
